I recently started designing jewelry, hand making pieces in my spare time. I MORE recently started getting into vintage jewelry design...something you just can't get away with using shiny silver. Darn! What's a girl to do with all these shiny silver jewelry pieces??
Don't get me wrong...
Shiny silver = love! Vintage silver = LOVE!
See the difference? ;)
That's when I read about oxidation and how certain chemicals can make silver pieces look old. PERFECT! But how do I do it? So, I looked into it...chemicals, store bought chemicals. :( Requiring rubber gloves and safety goggles to use. Well, I have two toddlers, so chemicals and their fumes just do NOT mix well with my thoughts of baby safety. (Yeah, I know...the babies wouldn't be playing with the chemicals. But, I don't know how strong the smell can be! I'd rather just not chance it.)
Okay, so let's just cut to the chase. I read where you could make your silver turn "antique" by using a HARD BOILED EGG. All natural. No chemicals, therefore SAFE! So, I did it! Here's how:
Here's what you need:
A hard boiled egg (you only use the yolk!)
zip lock bag
silver to turn "antique"
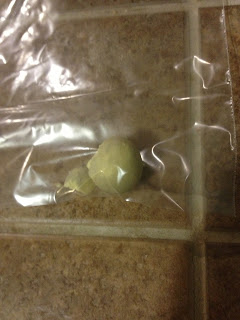
Put your egg yolk in the bag. :) Crush it up!
Put your silver in with the crushed yolk.
Tip: It is recommended to only use sterling silver .925 or LESS. .999 Sterling silver is hard to turn, apparently. My little chain is just a cheaper silver chain from a craft store...nothing fancy!
I squished mine all down into the corner to make sure it was all coated. I later found out this isn't necessarily needed. It's the sulfur (or sulphur) in the yolk that oxidizes silver, and many say just the gas alone (no need to touch the actual silver) will turn the silver *in time*.
I put mine in at 8pm, and at 10pm I decided to check on it. You can already see it's not as shiny as it was! I decided to put it back in, over night.
Just a picture of the clasp on my necklace...you can see it turning. This is after 2 hours.
Final results, from leaving these in the bag over night (total of 12 hours). I love it! Simply wash it with mild soap and use a small brush (jewelry cleaning brush worked great) to get all of the yolk out of the nooks.
You can see the coloring is uneven on the finished result. I happen to love this! Goes perfect with what I want to create! If you don't like the multi-colored look, they recommend NOT LETTING IT SIT ON THE YOLK. Instead, keep the yolk in the bag, but separate from the silver. I have not tried this, but maybe it will oxidize more evenly. (Not touching the yolk will take much longer...I would think 1-3 days, whereas this showed results in 2 hours!) You can always buff this up and shine it to how you like it, using polish cloths.
Enjoy!!
Check out my jewelry store on etsy!
and on facebook
Follow me on Instagram!
alli_McKenzie
:)


No comments:
Post a Comment